


Table of contents
Parts
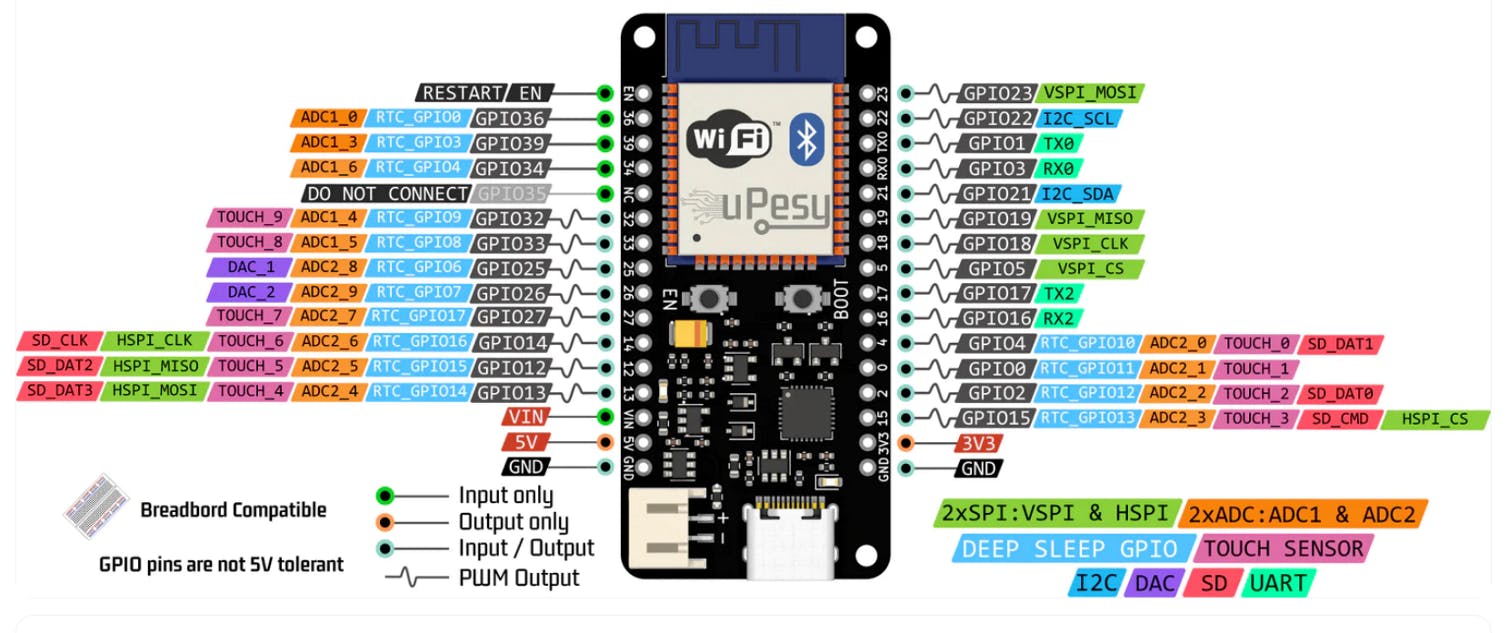
ESP-WROOM-32 ESP32 ESP-32S Development Board 2.4GHz Dual-Mode WiFi + Bluetooth
0.96" inch OLED Display Screen Module I2C IIC 128x64 S S - D - 1306 3.3V-5V Yellow+Blue for Arduino 2560 Nano ESP8266 ESP32
- For ESP32 DevKit, D22 is SCL, D23 is SDA, I2C address = 0x3C (verified)

Overview
I came across the ESP32 and had an idea for little device for teaching my daughter about electronics.
Digging it, I found that platformio on VSCode is pretty mainstream now.
Code
The following was put together from a few examples and fairly typically of hello-world demos.
main.cpp
#include <Adafruit_GFX.h>
#include <Adafruit_SSD1306.h>
#include <Arduino.h>
#include <SPI.h>
#include <Wire.h>

#define SCREEN_WIDTH 128 // OLED display width, in pixels
#define SCREEN_HEIGHT 64 // OLED display height, in pixels

// Declaration for an SSD1306 display connected to I2C (SDA, SCL pins)
// The pins for I2C are defined by the Wire-library.
// On an arduino UNO:       A4(SDA), A5(SCL)
// On an arduino MEGA 2560: 20(SDA), 21(SCL)
// On an arduino LEONARDO:   2(SDA),  3(SCL), ...
#define OLED_RESET -1 // Reset pin # (or -1 if sharing Arduino reset pin)
#define SCREEN_ADDRESS                                                         \
  0x3C ///< See datasheet for Address; 0x3D for 128x64, 0x3C for 128x32
Adafruit_SSD1306 display(SCREEN_WIDTH, SCREEN_HEIGHT, &Wire, OLED_RESET);

void testscrolltext(void);

void setup() {
  pinMode(LED_BUILTIN, OUTPUT);
  Serial.begin(115200);

  // SSD1306_SWITCHCAPVCC = generate display voltage from 3.3V internally
  if (!display.begin(SSD1306_SWITCHCAPVCC, SCREEN_ADDRESS)) {
    Serial.println(F("SSD1306 allocation failed"));
    for (;;)
      ; // Don't proceed, loop forever
  }

  // Show initial display buffer contents on the screen --
  // the library initializes this with an Adafruit splash screen.
  display.display();
  delay(2000); // Pause for 2 seconds

  testscrolltext();

  Serial.println("Hello from the setup");
}

void loop() {
  delay(1000);
  digitalWrite(LED_BUILTIN, HIGH);
  Serial.println("Hello from the loop");
  delay(1000);
  digitalWrite(LED_BUILTIN, LOW);
}

void testscrolltext(void) {
  display.clearDisplay();

  display.setTextSize(2); // Draw 2X-scale text
  display.setTextColor(SSD1306_WHITE);
  display.setCursor(10, 0);
  display.println(F("scroll"));
  display.display(); // Show initial text
  delay(100);

  // Scroll in various directions, pausing in-between:
  display.startscrollright(0x00, 0x0F);
  delay(2000);
  display.stopscroll();
  delay(1000);
  display.startscrollleft(0x00, 0x0F);
  delay(2000);
  display.stopscroll();
  delay(1000);
  display.startscrolldiagright(0x00, 0x07);
  delay(2000);
  display.startscrolldiagleft(0x00, 0x07);
  delay(2000);
  display.stopscroll();
  delay(1000);
}
platformio.ini
; PlatformIO Project Configuration File
;
;   Build options: build flags, source filter
;   Upload options: custom upload port, speed and extra flags
;   Library options: dependencies, extra library storages
;   Advanced options: extra scripting
;
; Please visit documentation for the other options and examples
; https://docs.platformio.org/page/projectconf.html

[env:esp32doit-devkit-v1]
platform = espressif32
board = esp32doit-devkit-v1
framework = arduino
monitor_speed = 115200
lib_deps =
    adafruit/Adafruit SSD1306@^2.5.9
    adafruit/Adafruit GFX Library@^1.11.9
    adafruit/Adafruit BusIO@^1.15.0
    Wire
  SPI
Take-aways
PlatformIO seems interesting. I was able to get going quickly after a YouTube or two.
I haven't looked into hooking up a JTAG, but seems to be possible on this platform.
The "Libraries" search tool is pretty useful.
Source
https://github.com/ericjameszimmerman/esp32-demo/releases/tag/0.1.0